| 🎯 What’s the goal? Get a free SSL Certificate for your website using Cloudflare and HTTPS. | ⚠️ Why does it matter? Using HTTPS is an important ranking factor for SEO. |
| 🏁 What’s the result? By default, your website is using HTTPS (SSL). | ⌚ When do you do this? Ideally as soon you put your website online, only once. |
| ✅ Any special requirements? You need to have your own domain name (SOP005). | 🙋♂️Who should do it? Owner of the website or the person in charge of managing it. |
👉 Where this is done: On Cloudflare.com.
⏳ How long will this take? about 20 minutes
Let’s get started, in 20 minutes your website will be more secure.

Environment setup:
- We recommend that you use the Google Chrome browser to navigate the web.
- Access to your Amazon Web Services (AWS) account,
- Access to your domain setting.
Creating an Account on Cloudflare.com
- Go to www.cloudflare.com.
- Click on “Sign Up”.

- Enter your “Email” address.

- Then come up with a “Password” - it needs to fulfil the criteria underneath.

- Finally, click on “Create Account”.

After creating your Cloudflare Account go check your email.
You should receive one from Cloudflare to verify your Email.

Open it and click on the provided link to finish the verification.

Logging into Cloudflare and connecting your website with it
- After verifying your email address go back to www.cloudflare.com.
- Click on “Log In”.

- Enter your “Email” and “Password” and click on “Log in”.

If you already added your website to your account and connect your domain with it you should skip directly to the section “Set up security and speed configuration for your website” of this SOP.
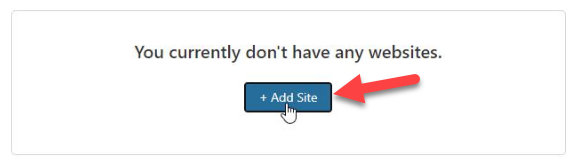
- After you log in you should see that “You currently don’t have any websites”.

- Click on “+ Add Site”.
- Enter your site (the domain you bought - e.g. “sitename.com”).

- Then click on “Add site”.

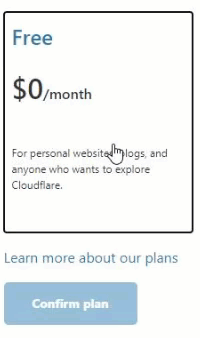
- Choose the “Free” plan.

- Then click on “Confirm plan”.
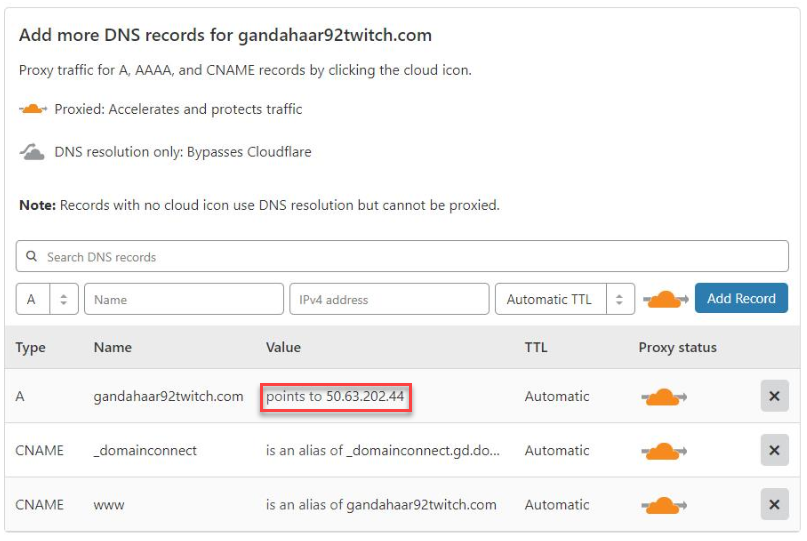
- Now you should see DNS records for your domain. You have to change highlighted “Value” to your website's Public IP address. Leave this page open in your browser.
- Go to aws.amazon.com. (in another tab of your web browser)
- Click on “Sign In to the Console”.

- Enter the Email address you used to create your Amazon Web Services Account (Make sure you selected “Root user”).

- Enter your AWS account password and press “Enter” on the keyboard or click on “Sign in”.

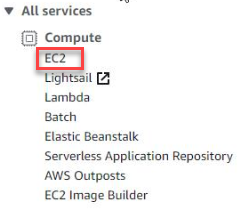
- After signing in choose “EC2” under “Compute” services.
- Then click on the “Instances” on the left side of the page.

- And there at the bottom of the page, you should see the “Description” tab and your “IPv4 Public IP”.

- Copy your “IPv4 Public IP”.

- Go back to “Cloudflare” and paste it in the place of highlighted value.

- After editing it should look like this (of course with your personal “IPv4 Public IP”).

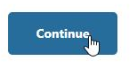
- Click on “Continue”.
Changing your nameservers
- After clicking on “Continue” you will be presented with new “nameservers” for your domain. For this SOP we bought a domain on GoDaddy.com so we will show how to change your “nameservers” on Godaddy.com. Cloudflare will always tell you which “nameservers” must be replaced no matter where you bought your domain. The option to manage “nameservers” will always be under “DNS” settings.

For the purpose of this SOP, we will operate on a domain from GoDaddy.
Check our SOP005 to find out how to buy a domain.
- Leave Cloudflare open and in another tab of your browser go to godaddy.com.
- Click on “Sign In”.

- Enter your account data and click on “Sign In” or choose to sign in with “Google” if you used it to create an account on GoDaddy.com.

- After you sign in you should see the domain that you bought. Click on “DNS” to access DNS settings.

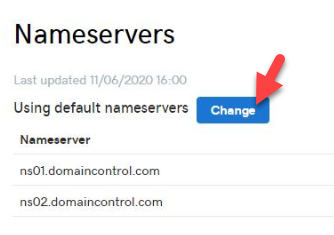
- Now you should see “Nameservers” page. Click on “Change”.
- Then “Enter my own nameservers (advanced)”.

- Now you should see two boxes called “Nameserver 1” and “Nameserver 2”. Leave this page open.

- Go back to Cloudflare.com and copy “Nameserver 1”.
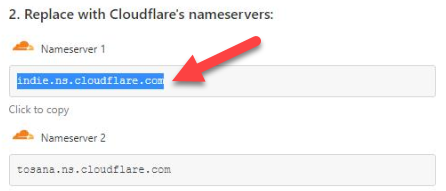
- Now go back to GoDaddy.com and paste it into the “Nameserver 1” box.

- Now you should do the same for “Nameserver 2”. Go back to Cloudflare and copy “Nameserver 2”.
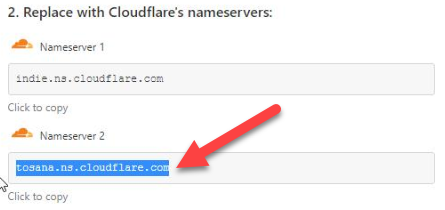
- Then go back to GoDaddy.com and paste it into the “Nameserver 2” box.

- Click on “Save”.

- After saving, refresh the GoDaddy.com page.

- And as you can see your domain now is “Using custom nameservers”.

- After that go back to Cloudflare.com and click on “Done, check nameservers”.

Set up security and speed configuration for your website
If you connected your website with your domain using Cloudflare earlier, to enter SSL configuration you have to choose “SSL/TLS” after logging in to your Cloudflare account and selecting your site.

If you performed previous steps from this post, you will be automatically redirected to SSL/TLS setting after you clicked “Done, check nameservers”.
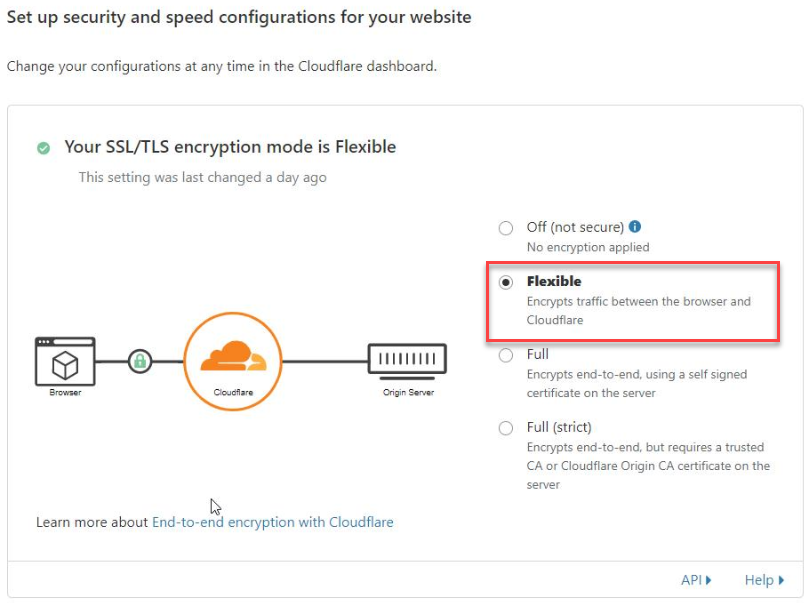
- Choose “Flexible”.
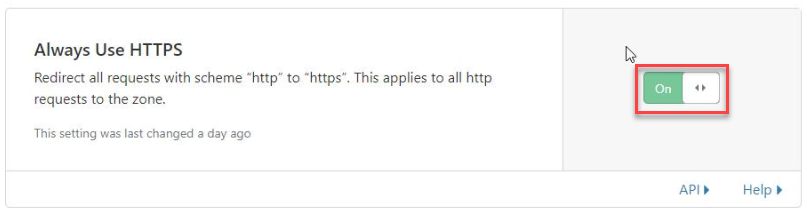
- Then click on “Edge Certificates” tab

- And make sure the switch is “On” next to the “Always Use HTTPS” option.
- Finally, you can go to “Speed” (1) in the “Optimization” (2) tab

- Check all boxes within the “Auto Minify” option.

- Then set the “Brotli” option “On”.
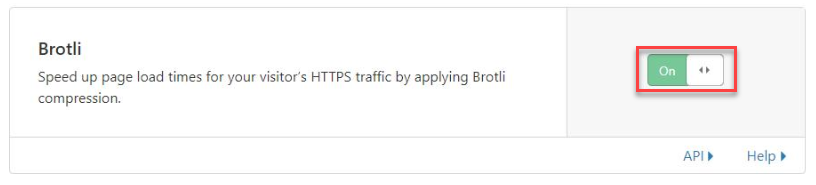
- Finally, click on “Done”.

Note that now DNS settings of your domain are managed by Cloudflare, so if you have to edit any of your DNS records in the future you will have to do it on your Cloudflare account.
Checking if your domain is secured and correctly assigned to your website
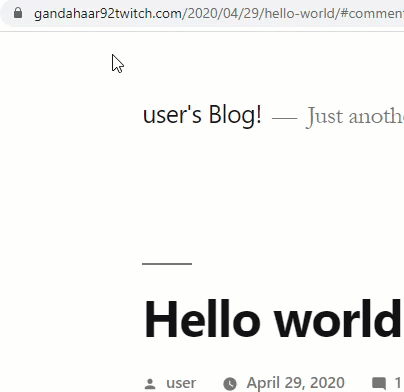
- Enter your domain into your web browser and press “Enter” on your keyboard.

- You should be connected to your website. Now click on the padlock at the left side of your website address, and here you can check if it is SSL Secure
You’re all set! Your domain is connected to your website and now your website is secured with an SSL certificate. Your website is now ready to welcome your audiences.

Ready to Transform Your Productivity?
At Lil Assistance, we've perfected the art of virtual assistant partnerships. Our flexible team model means you get the right specialist for every task, managed by experienced project managers who ensure quality and consistency.
Get Started with Your VA Team