| 🎯 What’s the goal? Add a new user to G-Suite and add an extra alias for any existing user. | ⚠️ Why does it matter? So you can invite a new user to your team. |
| 🏁 What’s the result? Creating a user with access to all G-Suite Tools and creating useful aliases. | ⌚ When do you do this? Every time you have a new team member or create a new VA persona. |
| ✅ Any special requirements? You need to get and configure G-Suite (Check our SOP016 and SOP017) | 🙋♂️Who should do it? Administrator of the G-Suite account. |
👉 Where this is done: In G-Suite Admin Console.
⏳ How long will this take? about 10 minutes.
Let’s get started and add new users to your G-Suite account.

Environment setup:
- We recommend that you use Google Chrome browser to navigate the web.
- You need to have a domain. Check our SOP005 on how to buy one.
Adding users to G-Suite account
- Go to G-Suite.
- Click on “Admin console” in the upper right corner.

- Log in with your G-Suite account (choose your main administrator account)

- In your Admin Panel click on “Users
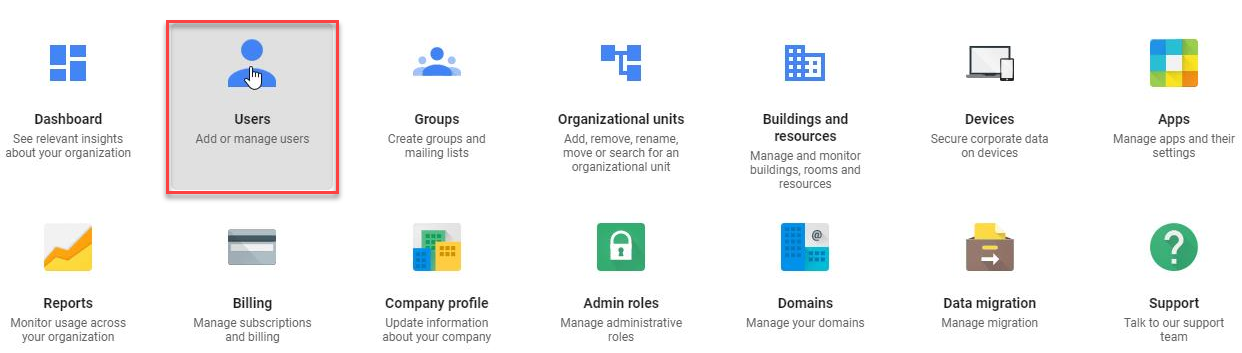
- Select “Add new user”.

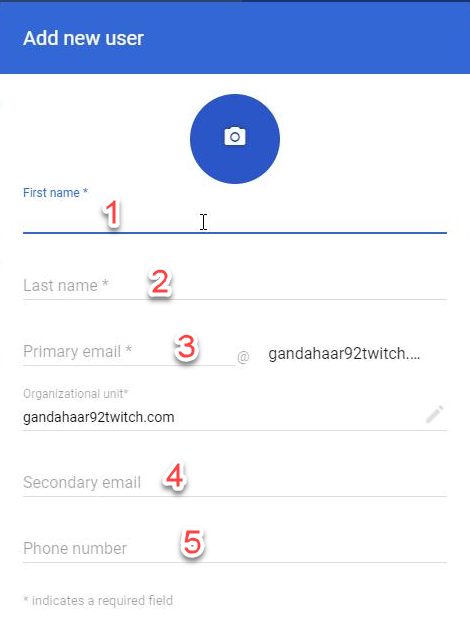
- A window will pop-up. Type new user’s data. Start off with “First name”(1) and “Last Name”(2). “Primary email”(3) will fill in automatically according to “First Name” but you can edit it manually (This will be the email address for a new user managed by your G-Suite account ended with “@yourdomainname.com”). We recommend you to also add “Secondary email”(4) – this is an existing private email of a new user. You can add “Phone number”(5) if you know it.
- Pick a “Password” for the new user. You can also click on the slider next to “Ask for a password change at the next sign-in” to make the user change the password to a new one when he or she will log in for the first time.

- Or if you click on a slider next to “Automatically generate a password”, the password will be generated automatically.

- Click on “Add New User” at the bottom of the window.

- The window will pop-up with the password (generated automatically or created manually). By clicking on the “Eye icon” you can see the password.

Forward the credential to the new user
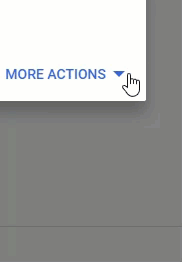
- Click on “More Actions” and choose “Email Login Info” (or “Print Login Info” if you want to present login information to a new user physically).
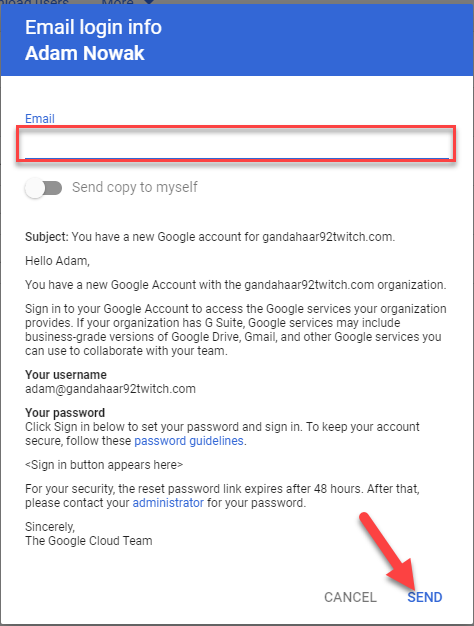
- Simply type the new user’s private “Email” address and click on “Send”.
First login as a new user
- Go to Google main page.
- Click on “Sign in” in the upper right corner.
- Type in the new user’s email address and click on “Next”.

- A window with some basic introduction will appear. Click on “Accept”.

- If you choose to select “Ask for a password change at the next sign-in” a window for creating a new password will appear. After creating one, click on “Change password”.

- After that the new user is successfully logged in…

- …and can start using Google tools such as “Gmail” or “Google Docs”.

Creating Aliases for existing G-Suite users
Remember that it cost money to add any additional user to G-Suite. But sometimes one email per user isn’t enough. But there is a solution, you can create unlimited aliases email for any existing user. Each alias is a new email address that will be forwarded directly to the main user’s G-Suite email, and these aliases are free and unlimited.
- Go to G-Suite.
- Click on “Admin console” in the upper right corner.
- Log in with your G-Suite account (choose your main administrator account)
- In your Admin Panel click on “Users”.
- You will be presented with a list of existing users within your G-Suite account. For this SOP we will be creating for our administrator user: Krystian Zgrzebniak – “gandahaar92twitch”.

- Click on the user name you want to have an alias email.

- Navigate to “User information”.

- Then click on “Pencil Icon” in the “Email aliases” line.

- In the “Alias” box type in desired alias – it will be the part of an email address before “@”.
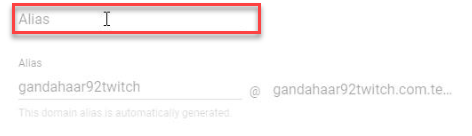
- For our SOP we will create “[email protected]” email address by typing “shopping” in the “Alias” box. After you create an alias, click on “Save”.

This procedure will cause any email sent to “[email protected]” to be automatically forwarded to the user you associate this alias.
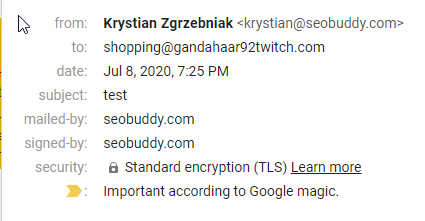
We will send a test email from “[email protected]” email address to “[email protected]”.

Now when we log in to “[email protected]” Google account and navigate to Gmail…

…we will find our test message.

As you can see it was sent to “[email protected]”.
This concludes our guide. Now you can easily add new users for your G-Suite account and create desired aliases, so you can have a professional-looking email address for every occasion.