| 🎯 What’s the goal? To set up 24/7 Monitoring for your website and be informed of any downtime. | ⚠️ Why does it matter? Setting Up monitoring for your website will allow you to keep track of any events that may disrupt your website’s online state. |
| 🏁 What’s the result? Uptime Monitoring set up correctly. | ⌚ When do you do this? Ideally as soon you put your website online, only once. |
| ✅ Any special requirements?UptimeRobot.com account | 🙋♂️Who should do it? Owner of the website or the person in charge of analytics. |
👉 Where this is done: In the UptimeRobot web page.
⏳ How long will this take? about 10 minutes.
in 10-min you’ll get notified in less than 5 minutes
of any downtime of your website.

Environment setup:
- We recommend that you use Google Chrome browser to navigate the web.
Creating UptimeRobot Account
- Go to the UptimeRobot website.
- Click on “Sign-up” in the upper right corner of the page.

- Choose “Free Plan”. You will be able to upgrade to paid “Pro Plan” later if you want to. For that SOP we choose “Free Plan” as it has all the necessary monitor options.

- Click “Sign Up” in the “Free Plan” tab.

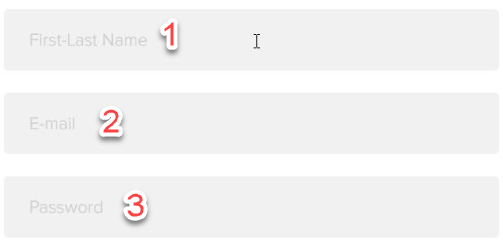
- Now you have to enter your “Name”(1), “E-mail”(2), and come up with a “Password”(3).
- Click on “Sign-up”.

- A message to check your e-mail will appear.

- Go check your email. You should find a message from “Uptime Robot” with the subject: “Uptime Robot - Account Activation”.

- Open the message and click on “clicking-here” to activate your account.

- You will be redirected to “Account Dashboard” on UptimeRobot website.

Adding a new monitor
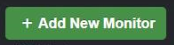
- Click on “+ Add New Monitor”.
- Choose “HTTP(s)” from the list.

- Now you have to fill in some data.
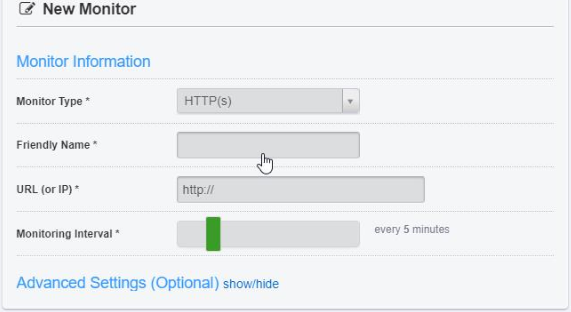
- Start off by typing “Friendly Name” for your monitor. It should be a name that you will easily recognize as a monitor of a particular website. (e.g.: mywebsite)

- Enter your website “URL (or IP)”. (eg: https://mywebsite.com)

- Set “Monitoring Interval” with the slider. You can choose from 5 minutes to 24 hours. Don’t set an interval below 5 minutes as this requires a paid plan.

Other “Advanced Settings”: “Custom Http Statuses”, “Custom Headers” and “SSL Settings” are accessible only with a paid plan.
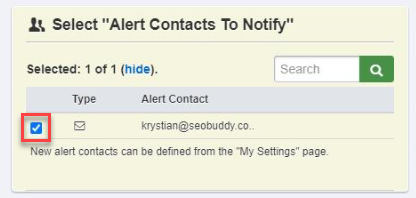
- Now choose “Alert Contacts To Notify” on the right side of the window. Simply check the box next to the email address you used to create the UptimeRobot account.
- Then click on “Create Monitor”.
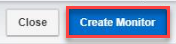
- A confirmation message will pop up.

- Now you can click on “Close”. And close the Internet browser.

Checking if the monitor is running correctly
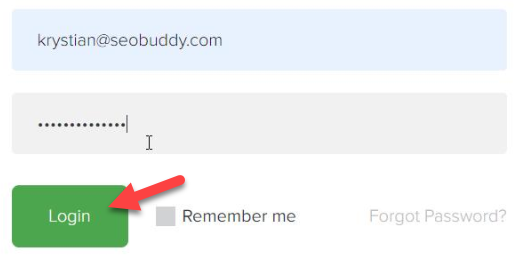
- Go to the UptimeRobot webpage.
- Click on “Login”.

- Enter your account information and click “Login”.

- You should be redirected to your “Account Dashboard”.

- Here you can see that you have 1 monitor “UP”.

- Choose your monitor from the list on the left side of the screen.

- And here you will see all monitor data for your website.

- You can click on “Export Logs” to download the log of your uptime data.

Adding more Alert Contacts
If needed, you can add multiple “Alert Contacts” to notify them when your website went offline, or use an additional alert method, such as SMS (Paid) or even on your Slack Group!
- Log in to your UptimeRobot account.
- You will be redirected to your “Account Dashboard”.

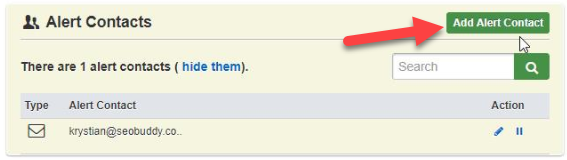
- Click on “My Settings” in the upper left corner of the page.

- Then click on “Add Alert Contact”.
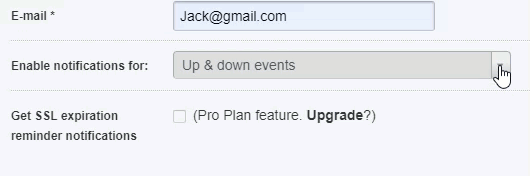
- Choose “Alert Contact Type”. We recommend choosing “E-mail”.

- Then Fill in with “Alert Contact Information”. Simply enter an “E-mail” of a person you want to inform about any alerts and add a “Friendly Name” name for that contact.

- Choose for which events you want to enable notifications for the new “Alert Contact”.
- Finally, click on “Create Alert Contact”.

Mission Accomplished! from now on, you’ll be the first to know
when your website/server is down!

Ready to Transform Your Productivity?
At Lil Assistance, we've perfected the art of virtual assistant partnerships. Our flexible team model means you get the right specialist for every task, managed by experienced project managers who ensure quality and consistency.
Get Started with Your VA Team